Out of the box your QNAP allows secure access to the administration interface however this is a generic certificate which displays and alert or error message.
To remove the alert or error message you can apply a certificate which has be issued by a trust authority such as Verisign, GeoTrust or Go-Daddy. The following steps describes how this can be achieved;
- First generate a certificate signing request (CSR) using Internet Information Server (IIS) – more info here: http://www.verisign.com/support/mpki-for-ssl-support/flash/How%20to%20Generate%20a%20CSR%20using%20IIS%206_v1.htm
- Complete the registration by pasting the CSR output into your chosen trust authority registration site
- Once the registration is complete you will receive Certificate (.CER)which can be import into back into IIS
- Once Certificate is imported and working in IIS, Export the Certificate to a PFX file with a pass-phrase you your computer
- Download and installextract OpenSSL from http://gnuwin32.sourceforge.net/packages/openssl.htm
- Run the following command “openssl.exe pkcs12 -in filename.pfx -nodes -out filename.key”
- Edit filename.key in NotePad this KEY file will contain the Certificate information required by your QNAP.
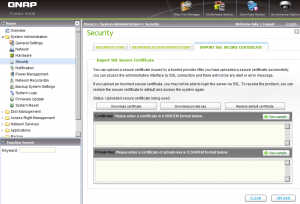
- Logon to the QNAP, then navigate to System Administration – Security – Import SSL Secure Certificate Tab
- Paste the related Key contents onto your QNAP
- certificate in X.509PEM will require the (—–BEGIN CERTIFICATE—–) section
- private key in X.509PEM will require the (—–BEGIN RSA PRIVATE KEY—–)section
Now test to see if you can access the QNAP Administration Interface using SSL (HTTPS://xxx)
If you upload an incorrect secure certificate, you may not be able to login the server via SSL. To resolve the problem, Login using the none sure URL then restore the secure certificate to default and access the system again. (Logon to the QNAP using HTTP, then navigate to System Administration – Security – Import SSL Secure Certificate Tab – Restore Default Certificate)

Hi Luke, Thanks for this post. Came in handy as I had to import wild card ssl from godaddy into a qnap ts410. followed this post and it worked brilliantly.
Please check out my blog, I’m a novice and only started a few weeks ago.
Cheers
Botha
Hello ,
What to do if you have installed an incorrect certificate on your Qnap and you forget that you forced access only by https. Now unfortunately i’m unable to access my Nas by web interface. Does pressing the reset button also restore the default certificate ?
Or is there another way around to restore the default certificate?
FTP and SSH is not available (i turned it off)
I have the same issue!
Hey buddy, your solution really solved my issues. I have successfully enabled my SSL certificate issued from a trusted provider!!!